JoesTechThoughts
Apple
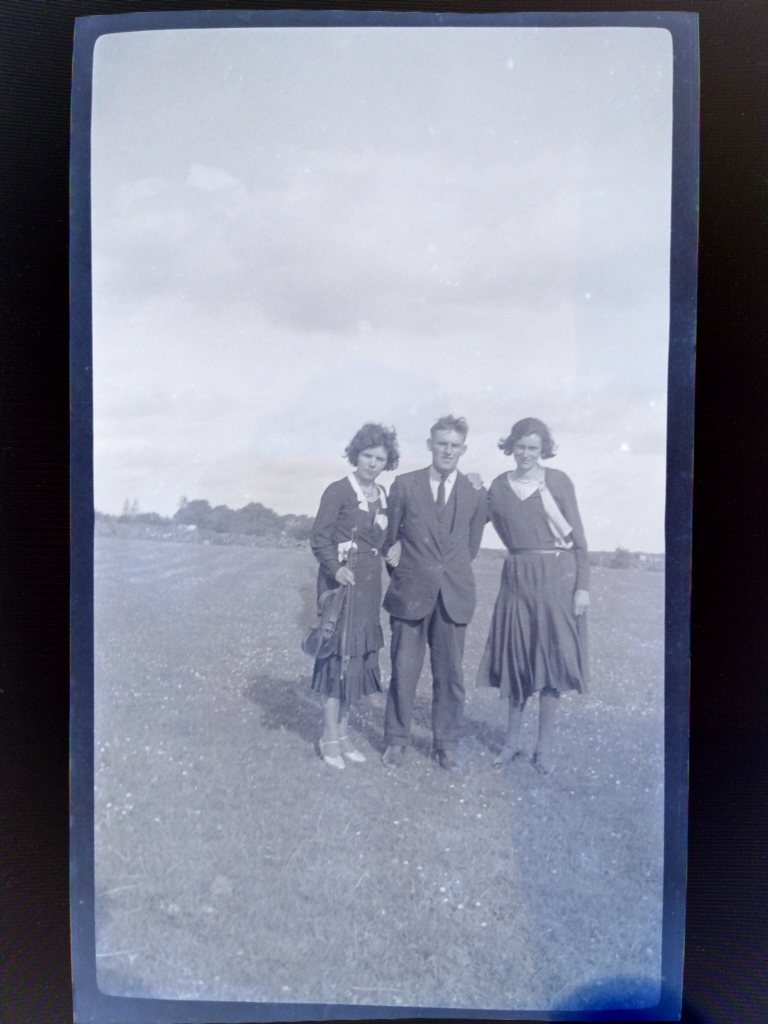
Taking 80 year old photos with an iPhone

Old negatives brought to life!
As a long time photographer, its always fascinating to try a new technique for creating images, and coming across such opportunities can get rarer and rarer. I had a fascinating evening figuring out a little photographic problem the other night. As part of The Gathering celebrations in Ireland this year, many towns and villages are hosting reunions, and Drumgowna in Co Leitrim is basing theirs around the old school – see their website at http://www.drumgownaschool.com .
A friend of ours who is living in the area came across a lovely find recently – an old shoebox full of old negatives. They looked really old, and were obviously well before 35mm film. I did some research and the film looks to be 116 film, which is 6.5 x 11cms and introduced in 1899 by Eastmas Kodak. As with any negative, holding them up to the light gives an idea of the image, but it's always difficult to really get a feel for the real image until it's been converted into a positive. So Reg arrived for the evening with the envelope of negatives and the question – could I turn them into photos she could see, and maybe then use as part of the village celebrations?
My first thought was that I might be able to use my new photo printer/scanner, but scanning the negatives just gave me very dark versions of the negative, so that wasn't going to work. then my wife reminded me that we had seen an app previously which claimed to be able to convert negatives, so I went on-line and soon hit on HelloPhoto. On visiting the Apple App Store I found that I already had the app, just not installed on my current iPad, but that only a took a few seconds to download. Reading the help screen I saw that this needed the app installed on my iPhone as well, so I did that, and was ready to begin.

Negive on iPad mini kit by HelloPhoto
My iPad mini was used as a light box – basically a light under the negative to make it stand out clear and sharp. HelloPhoto lets you set all kinds of screen sizes, colours and intensities, but I just set it to the maximum brightness (5500k) and full screen, then put the negative on the screen.
The next step was to fire up the app on my iPhone, and set it to photo taking mode in the app. Holding the phone about 12 cms above the iPad and negative, the iPhone then took a photo of the negative lit from below by the iPad, and then as if by magic, turned the negative into a real photo.
The buzz I got the first time I did this was something else! I never did film developing, only coming into serious photography with the advent of digital cameras, so the transformation and bringing to life of these old pieces of thin celluloid to images of real people from long ago was like magic.

It took a few extra steps to get to a workable process. I found that the negatives were not lying flat on the iPad screen, and after a few seconds the heat of the screen would make the negative curl up. I fixed this by finding a piece of card about the size of the iPad screen, then cutting a hole in it the size of the image on the negative – this could be placed carefully on the negative and held it down on the iPad screen with the card pressing down on the outer edges of the negative, just letting the image itself show through.
This had another benefit of reducing the upward glare of light, which was giving me an apple shaped reflection off the back of the iPhone. I got rid of this by cutting out a bit of paper the size of the back of the iPhone and sticky taping this onto the back of my phone, so there was no reflection.
Finally I had a bulletproof process, and the 30 or so negatives took about 15 minutes to turn into photos again – the first time these images had seen the light of day for over 80 years. I've reproduced a few of them below, and I think that the folks over in Drumgowna are going to use them as part of their exhibition for the School Reunion – check their website for more details of their events.


Getting the shot – Dublin Quays Panorama on iPhone
I’m often asked – how did you get that shot, so this is the first post in a series called “Getting the shot” where I will post a photo and then discuss the process of seeing, taking and processing it to a final image. I welcome comments and critique, so feel free to have your say!

Dublin Quays panorama – cropped version processed with SnapSeed
This image was taken on a night photo walk around Dublin’s Bord Gais Theatre and the south side of Dublin Quays earlier this week, and for this shot, rather than using my Nikon DSLR, I thought I would see what I could get using my iPhone 4. Low light poses a problem for the tiny lens and sensor on phone cameras in terms of getting quite grainy looking images, but nothing ventured…
Pre-visualization is a photographic technique which basically means having an idea in your mind’s eye of what you want your final image to look like. With a panorama shot, especially such a wide one as this, the image you end up with is actually quite different from any single view your eyes see, as to capture the 7 shots which make up this 1 image I had to rotate from left to right 180°. I wanted to get some sky, the buildings and also almost an equal depth of reflections, so for this set of shots I turned the iPhone portrait mode – so the individual shots were taller than wide.
The app I used for this composition is AutoStitch, but there are other good iPhone panorama apps which will do a similar job – Dermendar is one I reviewed here, and Microsoft have their PhotoSynth app which is also very good.
The reason I used AutoStitch is that it allows you to set quite high resolution settings for both the images, the blending process and the final output panorama – it can save a single panorama shot of up to 18Mb which makes for quite a large image. As you start to take your shots, and move round to the next position, you can see a ghostly image of the edge of your last shot which makes lining things up much easier.
Tip – always go into the settings of any photo app and set everything to the highest/best possible settings – anything less and you are really compromising the already limited abilities of the camera lens & sensor to deliver clean images.
There are many tripod mounts available for iPhones these days, but for these shots I was just standing very still and hand-holding – a bit crazy at 9pm with the light going fast, but hey – it was an experiment to see what I could get. Gotta have fun with your photography, and trying out stuff to see if it might work is all part of that.
So I took my 7 shots, then pressed the button to set AutoStitch to aligning and stitching the initial panorama together. Once this is done (which took about 10 minutes with the top quality settings and 7 shots to process) you end up with a raggedy looking wide panorama which you then need to crop to get a clean rectangle. AutoStitch automatically offers you the biggest crop area it can and generally I just accept that to lose the raggedy bits. Here’s the shot at this point of my process – note the quaysides showing at both edges of the shot showing that this is a full 180° panorama.

Dublin Quays panorama – initial version before additional cropping
Now, for many shots this is job done, but being an inveterate tinkerer I like to run photos through some post-processing just to see if things might be improved at all. This can of course be done on the iPhone screen, but I will generally wait until my photos have synced onto my iPad at home and then do editing on the much bigger iPad screen. My app of choice these days for most photo editing on the iPad is SnapSeed by Nik Software – it is simply superb, and quite the most powerful and easy to use photo editor I have yet tried – and I’ve tried pretty much everything out there! In the image version below I’ve applied a bit of selective brightening to the very dark building 2nd in from the right, and also applied a touch of “structure” from the detail menu in SnapSeed, which also brightened the sky up a touch.
I actually quite like the initial version’s composition as I think that the composition lines of the quayside at each edge of the shot work in taking your eye out to the other side of the river and the lit buildings. Penny, my wife suggested I try a crop to lose the quaysides and focus more on the lit buildings and reflections, which is shown below.
Which do you like better, and why? – please do post a comment and let me know :).

Dublin Quays panorama – cropped version with SnapSeed processing
Related articles
- Microsoft iPhone app creates panoramic photos (reviews.cnet.com)
- Autostitch for iOS adds augmented reality to improve panoramas (tuaw.com)
- AutoStitch Panorama, Now With Awesome Augmented-Reality ‘StitchGuide’ (cultofmac.com)
- DMD Panorama – Updated (theappwhisperer.com)
- Photosynth App: Make awesome interactive panoramas of every direction (geeksaresexy.net)
- AutoStitch Brings an Augmented Reality Camera to Panoramic Photography (themactrack.com)
- A Day In The Life Of Rad Drew – A Highly Creative And Professional iPhone Photographer (theappwhisperer.com)
Microsoft Office on the iPad
Finally, a working solution to using full featured MS Office applications on my iPad! When I first bought my now ageing iPad (version 1) the most important thing I found myself looking for after the initial few days of wonder had passed was a way to edit my MS Office created documents on this wonderful, portable tablet. Nothing really existed which would do it – Pages claims to be compatible but isn’t for anything other than the most basically formatted documents, but I tried it anyway, but never really got to grips with the different interface you have to adopt.
There are various business apps such as the one I bought as the best of the available functionality – DocsToGo, and it has been OK, but it doesn’t do what I really wanted – give me seamless editing of MS Office documents and the same menus and commands etc. as I have become used to from many years of laptop use.
So imagine my surprise when I came across what appears to be the answer to all my Office prayers whilst browsing the free apps in the app Store this week. No fanfare about this in the tech press, no highlight in my normal AppsGoneFree – source of many useful and otherwise hidden gems.
The app in question is called CloudOn! and the website, which will link you to the Apple and Android apps stores to download it, is at http://site.cloudon.com/.

MS Word, Excel and PowerPoint are all supported, and it’s just like being in your laptop copy of the same application. If you are a Microsoft user, and have been waiting for a proper way to edit and maintain your documents across platforms, this seems to be it!

If you enjoyed this post, please leave a comment, “Like” it on one of your social media sites or even better subscribe to the blog to get all the posts as they go up.
IKEA abstracts


Joe Houghton’s photostream on Flickr.
I decided to use a recent trip to IKEA as an excuse to spend a couple of hours seeing what I could do with my iPhone and the Pro HDR app. This set of abstract shots is the result – can you figure out what they all are?
Keep updated on new iPhone/iPad apps
![]() The Apple AppStore has hundreds of thousands of apps, and if you own an iDevice then keeping up to date with new apps can be a matter of seeing what your friends have come across. I downloaded a great little app a few months back which has become a regular in my early morning news trawl – AppAdvice.
The Apple AppStore has hundreds of thousands of apps, and if you own an iDevice then keeping up to date with new apps can be a matter of seeing what your friends have come across. I downloaded a great little app a few months back which has become a regular in my early morning news trawl – AppAdvice.
It’s a feed of reviews of new apps, plus curated collections of “best of” on a whole variety of different themes. Very useful for checking out the best apps in different categories as well as staying up to date on useful additions to your iPhone or iPad which don’t make it to the top of the AppStore charts.
An example of an app which I came across this way is Dermandar – see my earlier blog post here – a brilliant panorama app for your iPhone or iPad 2 (it only installs on iDevices with a camera).
The website is at http://appadvice.com/appnn
Easter Cross at St Mary’s, Leixlip

Easter Cross at St Mary’s, a photo by Joe Houghton on Flickr.
Using the tiny lens of the iPhone has some advantages – here I was able to get a very low angle which would have been difficult with an SLR sized lens…
ISO – What is it and how do I use it?
Do you ever wish you could get sharper shots when the light starts to go down, without using your flash or using a tripod?
Most cameras these days have an ISO setting, either on a button or somewhere in the menu. This post will tell you how to use the ISO settings to improve your ability to get sharper photos in low light. Thanks to Tony for asking for a post on this subject 🙂
ISO – increasing sensitivity to light
Let’s start by thinking back to before digital cameras, when we used to put film in before we could take photos. I know, seems crazy doesn’t it, and you had to wait for the film to come back from the processing shop before you got to see your shots too. Anyway, with film, if you were going to be shooting in lower light conditions – inside for instance, at a concert or church, you would load up your camera with faster film – the film would be 400 or 800 ASA rather than the normal 100 or 200 setting. This faster film was specially formulated to be more sensitive to light than the normal film, so you could still shoot and get hand held shots without the shutter speeds decreasing to a point where blur from hand shake would spoil the shots.
Nowadays, digital cameras don’t have film, so how do we set the camera up so we can get fast shutter speeds in lower light? By using the ISO setting to make the camera sensor more sensitive to light.
Taking control of your shutter speeds
You need to understand that most people can’t get sharp shots at shutter speeds much less than 1/30th of a second – maybe even 1/60th if your hand is shaky. Your hand and body movements transmit to the camera and introduce blur to your shots. And as you use your zoom the problem intensifies – the general rule of thumb is that whatever the zoom length you are using, you need to have a shutter speed of that zoom length/th of a second to get a sharp shot. So when you are zoomed out to 200mm trying to get little Tommy on stage in his angel outfit, if your shutter speed is less than 1/200th of a second you are unlikely to get a sharp handheld shot.
Yes, this does mean that you need to become aware of your shutter speeds when taking your shots. But that is a fundamental for good photography, and if you want to move away from full auto on your camera and begin to take more creative control, then you need to begin to use this knowledge to make your creative decisions as you take each photo. On most digital SLR cameras, when you are looking through the viewfinder, there are 2 numbers in the bottom of the screen. On compacts this information is normally on the back screen. One of these is the shutter speed, shown as a number which should be read as a fraction of a second. The other is a number with an “f” in front of it – we can ignore that for this post. So if you see 125, that’s 1/125th of a second. If you see 30 that’s 1/30th of a second. But if you see 15, or 8, or 4, they mean 1/15th, 1/8th or 1/4 of a second – all these are slower than 1/30th and when you see these you need to do something or your shot will be blurred. Even if you see 60 (1/60th of a second) if you are zoomed out at 100 or 200mm then you are still going to get movement blur when handheld.
So what ISO setting should I use?
In normal light, a setting of 100 or 200 is fine, and will give you the best quality shots. As you move into indoor lighting, which looks OK to our eyes but is much darker to a camera, settings of 400 or even 800 will give you a chance of handheld shots still being sharp. As ISO doubles, shutter speed halves, so going from 200 to 400 ISO will change your shutter speed from say 1/30th to 1/60th. Moving the ISO from 400 to 800 will halve the shutter speed again – from 1/60th to 1/125th. So you check as you frame your shot for what your shutter speed is, then you can adjust the ISO until you get a speed within the range where you can hold it steady.
So why not just use the highest ISO possible?
Good question. As the ISO number increases, the camera is actually pouring extra power into the sensor. In lower end cameras, the sensor pixels have a tendency to fluoresce as the power input increases, and so higher ISO settings result in some purpley grain-like spotting appearing, especially in darker areas of your shot. This is why it is always best to shoot at the lowest ISO you can, but if it’s the difference between getting the shot and not, then bang up the ISO!
So you use ISO to get handheld shots in lower light by dialling up the setting – the higher the ISO, the faster shutter speeds you get, but the down side is a slightly lower quality of colour graininess.
What about Auto ISO?
Many cameras come with an Auto ISO setting. This will automatically increase the ISO as soon as your shutter speed falls below a given value – typically set at 1/30th or 1/60th of a second (although this can be changed on some cameras). This is great for novices, but one thing to check and adjust is the higher end setting. If the Auto ISO range is say 100 to 3200, then shots taken using 3200 ISO are going to be very grainy looking on compact and entry level SLR sensors. The thing to do is experiment with the settings at 800 and above to see when the results get too grainy for you to be happy, and then set the upper Auto ISO limit to that.
What ISO should I use for night photography?
All the above has assumed that you are handholding your camera. If you are out in town doing a night shoot to get lovely urban or river shots at night, you are on a tripod. In this case, you set the ISO back down to your camera’s lowest ISO setting – probably 100 or 200. And turn Auto ISO off when’re you are on a tripod shooting at night, as you are going to be having shutter speeds of several seconds, even up to 30 or more. Really high quality night shots need the blacks to be proper black with no colour graininess showing, and this needs low ISO.
I hope this has demystified ISO for you. It’s a tricky subject to make accessible, so please leave a comment if you have any questions and I’ll do my best to respond 🙂
Joe Houghton Photography runs small group photo shoots, individual 1 on 1 tuition and photography assignments. You can see some of Joe’s photography on ArtistRising or at The Canvas Works, or on his Flickr site.
If you enjoyed this post, please leave a comment, “Like” it on one of your social media sites or even better subscribe to the blog to get all the posts as they go up. Happy shooting 🙂
Phone photography – always clean your lens!

In my recent post 10 Tips for … Better photos with your phone I mentioned that a common problem with phone photos is that the lens is often dirty and should always be cleaned before you start shooting.
I do this as a matter of course – or so I thought – but a few days back I was waiting at the start of a shoot and shooting some converging lines in the car-park when I noticed that the shot I’d just taken looked a bit soft.
Wiped the camera lens on my jeans ( this was my iPhone!) and re-took the shot, and guess what. Yes, it was much sharper – you can see the difference…

Joe Houghton Photography runs small group photo shoots, individual 1 on 1 tuition and photography assignments. You can see some of Joe’s photography on ArtistRising or atThe Canvas Works, or on his Flickr site.
If you enjoyed this post, please leave a comment, “Like” it on one of your social media sites or even better subscribe to the blog to get all the posts as they go up. Happy shooting
Reflections photography – love puddles!

Using reflections in your photography can result in striking images which most people at a scene would never even see, let alone manage to capture.
This is Donadea, a small forest park in Kildare and a favourite weekend run for us and the children – lovely lake, ducks to feed, perfect Sunday strolling.
Last time we went It had been raining earlier on in the day – that’s always great for photography as wet roads add to the scene anyway, but as we passed the ruined castle I was playing with shots, trying to get something I was happy with.
The shot on the right is probably the “standard” one most people would go for, but notice the little puddle on the path? I went down on my knees, and placing my index finger in the water as a rest for my iPhone, carefully placed the phone vertically on my finger with the camera lens down near the water (that’s important – the lens must be as close to the water as possible). A few shots later, the one on the left was the result.

I was using my favourite landscape photo app – Pro HDR (see my post here on it) but the key principle is getting down close to the water to maximise the reflection effect.
The shot here is another “puddle” reflection – the guy with his coffee is one of the horse-drawn buggy drivers waiting for tourists at the Guinness Storehouse in Dublin, and he was fascinated when I showed him the shot, no doubt after thinking I was mad to be messing in the puddles in the road in front of him.
Whenever you see water in front of a promising scene, try for a reflection shot. Still water is best but ripples – in a fountain pool for instance, can also add interest. Birdbaths are another great flat water mirror to utilise – you just have to be aware of the possibilities…
Joe Houghton Photography runs small group photo shoots, individual 1 on 1 tuition and photography assignments. You can see some of Joe’s photography on ArtistRising or at The Canvas Works, or on his Flickr site.
If you enjoyed this post, please leave a comment, “Like” it on one of your social media sites or even better subscribe to the blog to get all the posts as they go up. Happy shooting ![]()
Look at good photography…
A great way to gain inspiration and just keep your creative juices flowing is to regularly look at good photography.
One way I get my daily fix is through the Telegraph Pictures for iPad app, which each day gives me a sideshow of a dozen photos. It’s short enough to only take a few seconds to browse through, but there are always some great shots in there which often trigger thoughts of how I might be able to achieve similar results.
Check it out in the iOS App Store:
 |
Telegraph Pictures for iPadThe Telegraph Category: Photo & Video Updated: 10 Oct 2011
|
Light Stalking is another great source of excellent photography which again feeds the soul as well as the ideas bank – the link here is to their website but they do an excellent newsletter which keeps you updated with great photos, ideas and articles.


